Pages

Sunday, August 21, 2011

Dining Room Makeover Part 1

Ever had one of those days where everything seems to be going wrong and you need to do a little bit of shopping therapy? Yeah me too; however, my idea of shopping therapy is not clothing, make up or a new hairdo... no sir, it's Bunnings Hardware. So a few weeks ago, I had a shocker of a day at Uni where I was struggling BIG TIME with Algebra. It's not like I chose to do Algebra, but it's was one of the maths modules for the STEPS program and I was just getting frustrated that it wasn't sinking in.

I've been wanting to give my dining room a fresh look but needed a sander for the first project. Oh the choices. Do I get an orbital sander, a random ordital sander or a belt sander? A little research was needed and finally I decided on this little beauty.


Ok so it's not the best brand but it does the job :-) When I get a bit more financial I will probably upgrade and give this to Cody if he wants it.

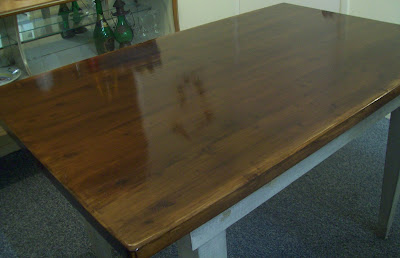
First kid off the block is this guy. Don't you just love the varnish knotty pine? Nah me neither.


and what about the chipped leg? I actually like this oddly enough.


Here it is again, now in its painted glory. First time I've attempted glazing though and finding glaze where I live is near impossible so I made my own using an acrylic paint conditioner called 'Floetrol' and black acrylic artists paint.


Not sure if I like the black but will live with it for a while to see if it grows on me.


and here it is with one of my future redo's. I've posted about these chairs here; however I'm tired of the crackle finish plus they just don't suit the new look I'm going for.


and one final look...

Before

After


I am linking up to:

The DIY Show Off


Till next time
Jenni

Monday, May 30, 2011

Made My First Banner

WOW! I finally learnt how to make my own banner last night. Yeah, I know it's not as fancy as a lot of banners out there in blog land but...

...it's all mine.


It can only get better from here with a lot of practice, experimenting and Google searches LOL

The tutorial for this can be found here

Thursday, March 10, 2011

Wire Jewellery Designs

Ok so I’m not a big fan of wearing jewellery but I LOVE making it.

I started making jewellery in about 2004, after joining a newly formed medieval group and watched with great interest one of the members making a chain maille armor. The moment I got home I went online and Google searched “chain maille”. Not only did I find more chain maille armor, but also chain maille jewellery and other wire based jewellery. Well I was hooked. I saved every image that caught my eye for inspiration and bought every magazine that had wire jewellery tutorials in it. As my own style developed I found that I went from Victorian style wired beads to mostly wire work.

This is one my first attempts at coiling

This is a popular design for beginners

Ouch, by the time I finished this piece my fingers were a bit sore

Another beautiful piece of wire work if I do say so myself

and other pretty piece

When I was a member of an SCA group
I was shown how to braid my own cord

Love these buttons.
They were in my Mum's bead collection
but I persuaded her to give me some for this project

Wednesday, March 9, 2011

Look What I Found On The Weekend

It’s been awhile since I made my way to the local recycle dump and it totally surprises me what people throw away. What surprises me even more is how people gather in front of the door like a herd of cattle and stampede in when the door is opened. But the biggest surprise was the snatch and grab mentality. Case in point, in order to put some cute little spice bottles into a just as cute little tin case which I will show you soon, I had to put the items I had up (only got two hands like the rest of us), and within seconds a man went to take one of the items saying he could not see my name on it. Guess I’ll just have to take a bag with me next time.

Anyways, here is my little collection of interesting finds.


Candle Hurricane
This is the item I almost lost. Isn’t it a little beauty? 

A view of the candle wax that needed to be removed

Spice Bottles

Tin Lunch Boxes

Salt and Pepper Shakers

Beauty Container

Jewellery

Waste Paper Bin
Love the black trimming with the studs.

And the grand total for all this? $5
Nope that's not a typo my friends. I paid just 5 bucks for this entire stash.

Looking forward to the weekend to see what else I can find for my home and stall.

Cheers

Wednesday, February 9, 2011

My Introduction to Painting Furniture

I bought 6 of these kitchen chairs back in 1999 for $20 each at a little second hand store at Bargara near Bundaberg QLD, and although they had a beautiful shape about them, the upholstery was so 1970’s. Ghastly brown and orange textured fabric that looked like, well, look at the before pic and I think you know what it looked like.

When I painted them, the crackle finish was so the in thing at the time. My first attempt, although I thought looked good, was quickly changed when my mum said it looked like “rotting timber”. OH NO!!!! It had to go, so when I found the gorgeous blue fabric I knew that it had to be blue and white.

Due to my lack of painting knowledge at the time, I used artists’ tube paint, and boy did I spend a fortune. I guess that’s why I took so long to paint them.

Lesson learned: Use house paint. It reacts the same way to crackle medium and is a lot cheaper. I’ve heard that a type of glue “Elmer’s Glue” works just as well as crackle medium so I’ll have to experiment one day with other brands

BEFORE

AFTER